
How to build your website.
DIY with Squarespace
||
DIY with Squarespace ||
A website makes your business look professional. Starting a website can feel intimidating, but if you're thinking about it, it's a sign you're ready to fully launch your business to the world, and all the hard work you've put into your business plan and brand strategy is paying off.
Social media platforms offer ways to showcase your products and services, but a website provides more control over how you communicate to your audience. In addition, websites provide permanence, making it easier for your target audience to discover your business online.
Not sure if the time is right? Here are our tips on what you need and how to create a website with Squarespace.


WHAT YOU NEED FOR YOUR WEBSITE
Once you've committed to a business name and idea, it's time to prepare everything for your website.
REGISTER YOUR DOMAIN NAME
A domain name is what you type into their internet browser to access a website. Domains vary in price; however, when you sign up for an annual plan with Squarespace, you get a free domain name. Your domain name should be the same as your business name or related as closely as possible. Sometimes this isn't always possible, although there are easy ways around this. For example, creatives might append words like "author" or "art" to their domain name.
Squarespace only allows .com domains, so if you want .co.nz, .nz, or .aus, you will need to find a third-party domain host and connect your DNS settings to your Squarespace website.
CONTENT FOR YOUR WEBSITE
Your website needs written and visual content to reflect your brand, products, or services.
Creating photos can be as simple as taking pictures with your mobile phone, but if you're not ready to use your photos, you can use stock images from Unsplash, built into Squarespace, and easy to add to your website. If you are selling products, we recommend you take photos for your website to provide an accurate visual of your business.
Websites also need written content, preferably with search engine optimization (SEO), so your website appears in organic internet searches. To optimize written text for internet searches, you use keywords and phrases people might search for in the text — for example, "Web Design in Dunedin, NZ".
SITE LAYOUT
Before you start building your website, we recommend you think about how you want your website to look.
Find other websites you like for inspiration, and think about the pages you will have, how you will layout the pages and menu, and what you will include on each page. Think about your ‘Call to actions’ on your pages and where they lead to.
This will save you time when building your website.


HOW TO BUILD A WEBSITE WITH SQUARESPACE
CHOOSE A TEMPLATE
Building your website with Squarespace is easy, with a step-by-step guide. First, on the Squarespace home page, select the button in the top right corner that says 'Get Started'.
From here, you share some details about your business. These 3 Questions include:
What is your site about? (i.e. Fashion, Marketing, Design?)
What are your top goals? (i.e. Sell products, market my business, publish a blog).
Where are you in your process? (Turning a hobby into a business)
Based on your answers, Squarespace will make some suggestions for templates that may be suitable for you to use when creating your website.
If you see a template that piques your interest, you can hover over the image and select to preview the template.
If you find a template you're happy with, hover over the image and select 'Start with template name"
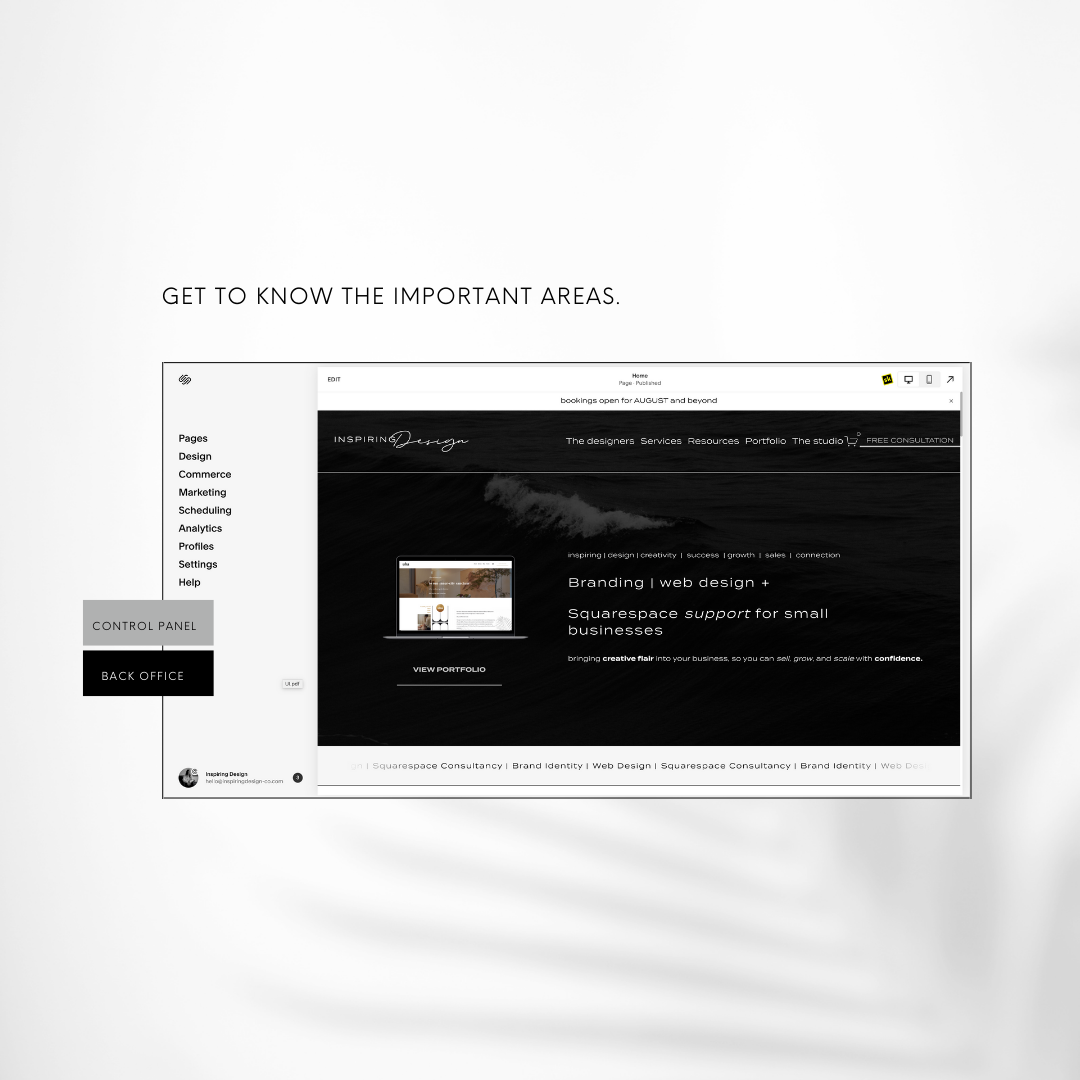
GET TO KNOW THE IMPORTANT AREAS.
You will then be sent to your Squarespace Commerce area.
In the top right-hand corner, You can click 'Edit Site', which will take you to your website template. From here, you can start designing your page layouts as you please. We recommend clicking on ‘HOME’ in the top left corner first.
Here you will see your navigation board to help set up your website.
Pages: Will show you the pages you have on your website.
Design: This is where you can add your brand colours and fonts you want to use in the site styles area.
Commerce: Where you can add the products and services you want to sell to your customers, and keep track of inventory.
Marketing: Great tools for you to send emails to your subscribers, add promotional pop-ups on your screens to capture subscriber leads or offer discounts,
Scheduling: Squarespace built-in appointment system with partners’ acuity.
Analytics: Get a detailed overview of how your website is performing. Everything from sales for the month, to where your visitors are coming from.
Profiles: Where all of your customer and subscriber details are held. Helps you to understand your audience and identify ways to connect with them based on their activity with your website.
Settings: Of course, this is where all the nitty-gritty details are kept. Your business details include social media links, domains, billing details, and permissions (people who have access to your site and what permissions they have).
Going through these areas first, especially the design area, can help you when you start creating your website pages.

START TO D I Y YOUR WEBSITE.
BUILD YOUR PAGES TO SHARE YOUR STORY.
From the home area, click on ‘pages’ to start creating and editing your website. Start with the basics. Go back to the plan you made about what pages you wanted to have on your site and work on one page at a time.
Create your home page to grab your audience’s attention with appealing images, text that explains what you offer and how, and share what’s hot i.e. your newest products, testimonials, and links to your social pages.
Create an about page to share more about your business in detail i.e. how your business started, who is in your team, where you are based, and your business values. Find a way to add a button to connect them to blogs or your store. Keep them on your website and direct them where you want.
Add a shop area to sell your products or services. Make sure each item has a detailed description of what’s on offer, prices, images, and variants
Or add a blog page or portfolio to share your success, experience, and knowledge within your industry to educate and inspire your audience.
Things to know.
Main Navigation: What appears in your website menu.
Not Linked: Pages on your website that may not show up in your menu, i.e. home page, Terms and Conditions, Refund policies, and FAQs that you may want visible by clicking on words in other areas, i.e. Footer of page.
Header - the top area of a website that is usually fixed, i.e. business name/logo and menu bar.
Footer: The bottom area of a page that once again has the business name, Social icons connecting you to social platforms, and areas for customers to find important details such as terms and conditions, FAQs, contact details, refunds policies, and website copyright details.
+ Symbol: Click this to add a new page and save time by choosing page layouts' to be given pre-made page options.
Clog Symbol: Click on this to change your page settings such as the name of a page, the URL, and the SEO page description.
EDIT/ADD Sections: To add a section, hover your mouse over the area you want to add a new section. A tab that says ‘ADD SECTION’ will appear. This is where you can add more areas/sections to your pages.
To edit a section, text, or image, hover over the area and once the blue outline appears, click on this area to start editing. Adding a block allows you to add something new in that section i.e. an image, new text box, or button.
Once you feel like your website is ready - go to your home navigation and select ‘Settings’, then ‘Site Availability, and PUBLISH! (If you haven’t selected a plan, it will get you to do so before it publishes). AND THERE IT IS! Your website is live.
Make sure you share it with your friends and family, and with your current audience if you have already been selling via social media or local markets.


Your website is officially live! But that doesn't mean your work is done. In fact, it’s now all about maintenance.
Try to add new content to your website frequently, so it doesn't become stale. This will encourage your visitors to keep coming back. Make sure you’re always promoting offers, new product images, and upcoming events.
Squarespace is an easy-to-use drag-and-drop website builder, with plenty of options available at your fingertips - all while receiving prompts and support along the way. Give it a go. There is nothing better than being able to say you built your own website.
If you need help along the way or an extra set of eyes before publishing your website for the world to see - we’re happy to chat with you. Book a Squarespace consultation to get the help you need.
OR if you need a website for your business, but don’t have the time to do it yourself, let us take care of things. Book a discovery call with us today to discuss your website needs and let us bring your vision to life.
Written by: Natasha Tahiwi | To Done (NZ)
Published by: Inspiring Design & Co.